Installation Instructions for Linear Drains
SereneDrains Linear Drains Installation Instructions
General Installation Tips
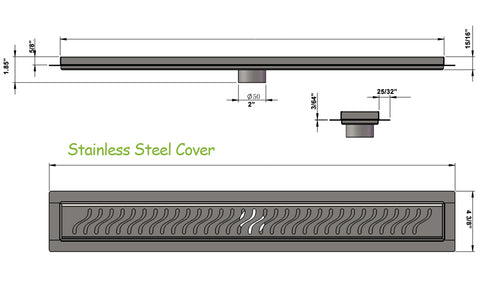
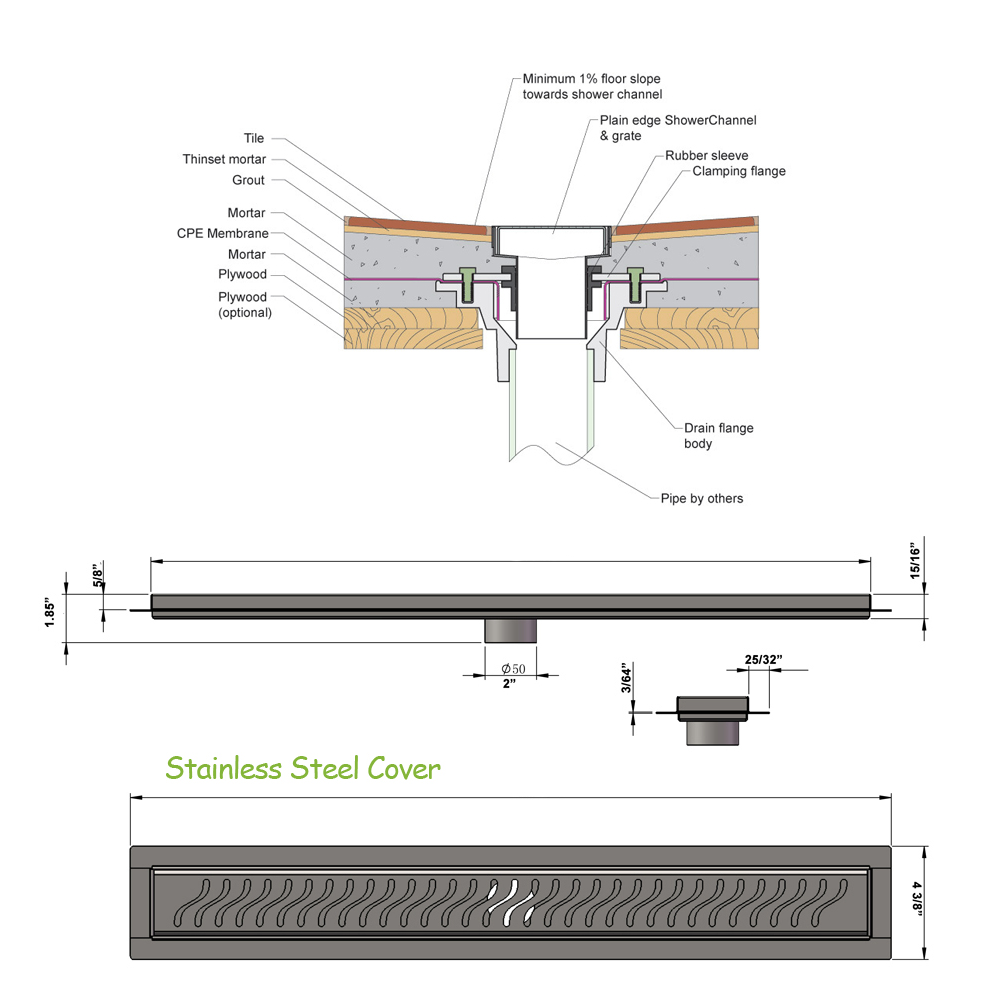
Linear drains with stainless steel grates are typically positioned against the end or side wall or shower threshold, although they can be placed anywhere as long as there's a ¼” per foot slope leading to the drain. The 1” flange ensures that the grate aligns flush with the wall tile.
Ensure that any waterproofing layer is supported by a pitched slope of 1/4” per foot toward the drain, whether the waterproof membrane coat is beneath the thick bed mortar or on top.
Always use reinforcing fabric with liquid applied membranes for gaps greater than 1/8”. It's advisable to employ reinforcing fabric at the junction of the drain flange and mortar bed, as well as at any floor-to-wall transitions, to enhance durability.
When installing a curbless shower, position the drain parallel to the entry (threshold, middle, or back of the shower) to prevent an uneven or sloping entryway.
If placing the drain flush against walls, ensure that the back and/or sides of the flange are set against the studs or sill plate, with the center of the waste pipe approximately 2 1/4” out. Backer board should be installed directly on top of the flange.
Account for the thickness of thin-set, waterproofing, and tiles to make any necessary adjustments, so the finished wall tile sits approximately 1/16” from the inside of the drain cavity wall, allowing for the proper placement of the grate.
Position the floor tiles 1/16” from the edge of the grate to facilitate smooth installation and removal of the grate.
Installation Instructions

Step 1: Pre-slope the shower pan and install waterproofing according to the manufacturer's instructions. You can use various waterproofing materials or methods, such as vinyl, CPE membrane, roll-on/paint-on, metal pan, hot mop, surface sheet membrane, etc. Perform a leak test as required.
Step 2: The standard channel width for SereneDrains Linear Drains is 2 3/4” (70mm). Ensure that the rough opening is approximately 2” wider than the drain length to accommodate backer board and wall tile thickness. For example, a 38” rough opening will result in a close-to-36” finish opening based on the thickness of materials.
Step 3: Use a 3” wide piece of wood cut to the appropriate length as a linear drain placeholder. This allows for an approximately 1/8” gap around the channel's perimeter for applying a bead of flexible sealant.
Step 4: Build a mortar bed and install the tile to create a 1-2% grade towards the drain.
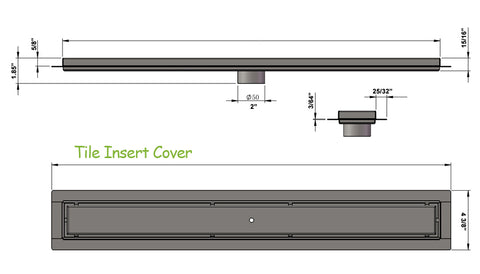
Step 5: For Tile Insert Drains, install the tile into the tile insert tray.
Step 6: Remove the wood, clean out any void, and install the Royal Linear Drain channel as you would with any tile, building up and providing support with mortar as needed. Ensure that the drain channel is level and just slightly below (1/16” or less) the adjacent tile.